SAML Authentication
Ascender Ledger Pro can delegate sign-in to your organization's identity provider (IdP) using SAML 2.0. Ledger Pro acts as the Service Provider (SP): it never stores SSO passwords, and it provisions accounts automatically the first time a user signs in.
Ledger Pro works with any standards-compliant SAML 2.0 identity provider, including Auth0, Okta, Keycloak, Microsoft Entra ID, and AD FS. CIQ does not publish a separate procedure for each provider. The values Ledger Pro needs are the same everywhere, and the Auth0 example below shows where a typical provider exposes them.
Before you begin
You need all of the following:
- An application registered for Ledger Pro in your identity provider. Most providers call this an application, a client, or a relying party.
- The IdP metadata for that application: its issuer (entity ID), single sign-on URL, and signing certificate.
- Administrator access to Ledger Pro, so you can reach Settings then Authentication.
- Ledger Pro served over HTTPS. Sign-in works without TLS, but one validation step is skipped. See Serve Ledger Pro over HTTPS.
How SAML sign-in works
- The user selects Log in to your Company on the Ledger Pro login page.
- Ledger Pro builds an authentication request and sends it to your IdP's single sign-on URL using the configured binding method.
- The user authenticates at the IdP.
- The IdP posts a signed SAML response back to Ledger Pro's assertion consumer service (ACS) endpoint.
- Ledger Pro validates the response, maps the returned attributes to account fields, creates or updates the local account, reconciles team membership, and starts the session.
Sign-in started from the IdP's own dashboard (IdP-initiated sign-in) is also supported. Every validation still applies, except the correlation between the response and a request Ledger Pro sent.
SAML endpoints
These endpoints are public and do not require an existing session, because your IdP posts to them across sites.
| Purpose | Method | Path |
|---|---|---|
| Start sign-in from Ledger Pro | GET | /login_saml/ |
| Assertion consumer service | POST | /acs |
Configure SAML in Ledger Pro
Open Settings, select Authentication, then select the SAML tab. Turn on Enable SAML and complete both columns, then select Save.
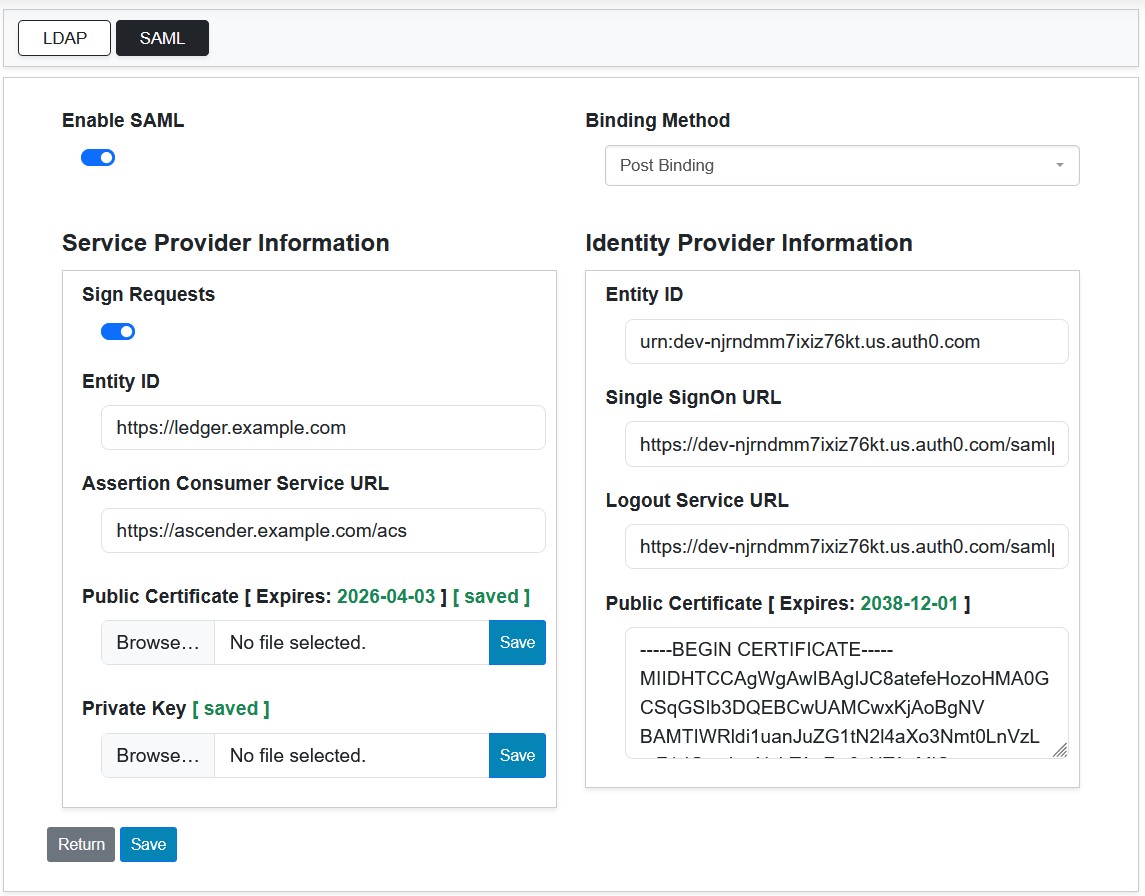
Enabling SAML adds a Log in to your Company button to the login page. Local and
LDAP sign-in continue to work, so you do not
lose access to the local admin account while you are setting SAML up.
Service Provider information
This column describes Ledger Pro itself. You register these values with your identity provider.
| Field | Required | Description |
|---|---|---|
| Sign Requests | No | Signs outgoing authentication and logout requests with the SP private key, using RSA-SHA256. Requires the certificate and private key below. |
| Entity ID | Yes | Ledger Pro's unique identifier, typically its base URL, for example https://ledger.example.com/. This value must match the audience your IdP places in the assertion. |
| Assertion Consumer Service URL | Yes | The public URL your IdP posts the SAML response to. It must end in /acs, for example https://ledger.example.com/acs. |
| Public Certificate | Only when signing | The SP public X.509 certificate, uploaded as a PEM file. |
| Private Key | Only when signing | The matching private key, uploaded as a PEM file and stored encrypted. |
The ACS URL is also the value Ledger Pro sends as the
AssertionConsumerServiceURL in its authentication request, so your identity
provider must accept it as a valid reply URL for the application.
The certificate and private key fields only store a value when you upload a
file, and they show [ saved ] once one is stored. Re-saving the form without
re-uploading keeps the existing certificate and key.
Identity Provider information
This column describes your IdP. Every value comes from the IdP metadata for the application you registered.
| Field | Required | Description |
|---|---|---|
| Entity ID | Yes | The IdP's issuer. Ledger Pro compares this against the issuer in every response. |
| Single SignOn URL | Yes | The IdP endpoint Ledger Pro sends authentication requests to. |
| Logout Service URL | No | The IdP's single logout endpoint. Not currently used, see Logging out. Leave blank. |
| Public Certificate | Yes | The IdP signing certificate, pasted as a PEM block or as bare base64. Used to verify the signature on the response. |
Entity ID under Identity Provider information must be the issuer your IdP
advertises, for example urn:your-tenant.us.auth0.com. It is not an OAuth or
OIDC client ID or application ID. Some providers present a client ID more
prominently than the issuer, and using it here is the most common cause of a
failed SAML sign-in. See
Troubleshooting.
Binding method
Binding Method controls how Ledger Pro sends its authentication and logout requests to the IdP:
| Method | Behavior |
|---|---|
| Redirect Binding | The request travels in the URL of a browser redirect. This is the default. |
| Post Binding | The request travels in the body of an auto-submitting HTML form. |
Both are supported, and most identity providers accept either. Your IdP always returns its response to the ACS endpoint by HTTP POST, whichever binding you choose for the outgoing request.
Sign requests
Signing outgoing requests is optional. It lets the IdP verify that a request genuinely came from your Ledger Pro instance. If your IdP requires signed requests, turn on Sign Requests and upload an X.509 certificate and private key.
A self-signed pair is acceptable for most providers. To generate one:
openssl req -newkey rsa:2048 -nodes -keyout private.pem -x509 -days 365 -out certificate.pem
If your identity provider requires a certificate signed by a known certificate authority, have the certificate signed before uploading it.
Serve Ledger Pro over HTTPS
When Ledger Pro starts a sign-in, it stores the request ID in a short-lived
cookie marked Secure, then checks that the IdP's response corresponds to that
request. On a deployment that browsers reach over plain HTTP, the cookie is
dropped and Ledger Pro treats the response as IdP-initiated, skipping only that
correlation check. All signature, issuer, audience, destination, and timestamp
validation still applies.
Serve Ledger Pro over HTTPS in production so this check is active. A
TLS-terminating proxy satisfies this as long as the browser reaches Ledger Pro
over https://.
How responses are validated
Ledger Pro rejects any SAML response that fails any of these checks:
| Check | Requirement |
|---|---|
| Signature | The response, or every assertion in it, must be signed and verify against the configured IdP public certificate. Unsigned messages are rejected. |
| Issuer | The response issuer must equal the IdP Entity ID. |
| Audience | The assertion audience must equal the SP Entity ID. This is what stops a token minted for another application from being replayed into Ledger Pro. |
| Destination | The destination or recipient must match the Assertion Consumer Service URL. |
| Timestamps | The issue instant, the assertion validity window, and the subject confirmation expiry must all be current, allowing for small clock skew. |
| Request correlation | For sign-ins started from Ledger Pro, the response must correspond to the request Ledger Pro sent. Skipped for IdP-initiated sign-in. |
| Status | The SAML status must be success. |
Attribute mapping
Your IdP decides which attributes it sends in the assertion. Configuring that mapping in the IdP is the step most often missed, because Ledger Pro can only populate the fields your IdP actually sends.
Ledger Pro normalizes each incoming attribute name by taking the last path
segment of the attribute Name, falling back to its FriendlyName, and
lower-casing it. A claim sent as
http://schemas.xmlsoap.org/ws/2005/05/identity/claims/emailaddress therefore
arrives as emailaddress and maps to the email field. You do not need to strip
the schema prefix yourself.
Ledger Pro recognizes these attribute names:
| Attribute name sent by the IdP | Maps to |
|---|---|
email, mail, emailaddress | |
username, nickname, userprincipalname, samaccountname | Username |
givenname, firstname | Given name |
surname, lastname | Surname |
name, displayname, commonname, preferredname | Full name |
nameidentifier | Name ID |
privatepersonalidentifier | ID |
clientid | Session ID |
role | Profile |
group, groups | Groups, multi-valued |
Notes on this table:
- Any one of the listed aliases works. Send
mailoremailoremailaddress, whichever your IdP produces natively. - Both
groupandgroupsare accepted. The SAML 2.0 specification uses the singular form, but many identity providers send the plural, so Ledger Pro handles either. - Ledger Pro resolves the account by username first, or by name ID when no
username attribute is present, then by email. When no account matches, it
creates one with the type
saml. rolepopulates a profile field that Ledger Pro stores on the account but does not currently act on. Identity providers that send a role or group list by default, Keycloak among them, will populate it. There is no need to suppress the attribute at the identity provider.- Display name and email are refreshed from the IdP on every sign-in. The display name is derived from given name plus surname, then a full-name attribute, then username, then email.
Sending a username attribute and an email attribute is enough to sign in. Add a given name and surname for a readable display name, and add groups if you want automatic team placement.
Mapping groups to teams
Team membership is driven entirely by the group or groups attribute.
- Configure your IdP to send group or role membership in a
grouporgroupsattribute. - In Ledger Pro, open Admin then Teams, and set the SAML Group Name field on each team to the matching group name from your IdP.
On every SAML sign-in, for each team that has a SAML Group Name configured, Ledger Pro adds the user when the assertion's group values contain that name and removes the user when they do not. Teams with no SAML Group Name are left untouched, so locally managed teams are unaffected.
Because your IdP is authoritative for group membership, removing a user from a group in the IdP removes them from the corresponding Ledger Pro team on their next sign-in.
Logging out
When a SAML user logs out of Ledger Pro, the local Ledger Pro session is cleared and the user is returned to the login page.
Ledger Pro does not currently implement SAML Single Logout. The Logout Service URL field is present on the settings page, but Ledger Pro exposes no SLO return endpoint, so logging out of Ledger Pro does not end the session at your identity provider. Leave the field blank. Single Logout is planned for a future release.
The practical effect is that a user who logs out of Ledger Pro and then selects Log in to your Company again is signed straight back in, because their IdP session is still active. To fully sign out, the user must also log out at the identity provider, or wait for the IdP session to expire.
This is normal for many single sign-on deployments: identity providers commonly end sessions on their own schedule or after a period of inactivity rather than on demand.
Testing your configuration
Save the SAML settings first, then use the Test button on the SAML settings page. It validates the saved configuration: required fields are present, the certificates and key parse correctly, and the service provider can be assembled.
The test does not perform a browser round trip to your IdP. Confirm end-to-end sign-on by signing out and selecting Log in to your Company on the login page, using an account that is a member of at least one mapped group.
Troubleshooting
Set DEBUG=true to log the full assertion and each validation step. See
Configuration for logging options.
| Symptom | Cause and fix |
|---|---|
invalid xml: no root | The SAML response field was empty or was not valid XML. Confirm your IdP posts to the correct Assertion Consumer Service URL. |
response Issuer does not match the IDP metadata | The IdP Entity ID does not equal the issuer in the response. Set it to the issuer your IdP advertises, not a client or application ID. |
| Your IdP rejects the request before showing a login form, for example a client or application not found error | The identity provider does not recognize the SP Entity ID that Ledger Pro sent as its issuer. The registered value at the IdP must match it character for character, trailing slash included. Compare them using the technique below. |
assertion Conditions AudienceRestriction does not contain ... | The SP Entity ID does not match the audience your IdP sent. Make the two identical, and watch for a trailing slash on one but not the other. |
| Destination or recipient mismatch | The Assertion Consumer Service URL must match the URL your IdP posts to exactly, including scheme, host, port, and path. |
| Signature errors | The IdP Public Certificate is missing or wrong, or the message is unsigned. Confirm your IdP signs the response or the assertion, and that the certificate you pasted matches the IdP's current signing key. |
| Request correlation skipped, treated as IdP-initiated | Expected on deployments not served over HTTPS, and on genuine IdP-initiated sign-in. See Serve Ledger Pro over HTTPS. |
| Sign-in succeeds but the user has no teams | Your IdP is not sending a group or groups attribute, or the SAML Group Name on the team does not match the value sent. Enable debug logging and check the attributes in the assertion. |
| Sign-in succeeds but the display name is blank or odd | Your IdP is not sending name attributes. Map a given name and surname, or a full-name attribute, in the IdP. |
If sign-in still fails after working through this table, contact CIQ Support with the debug log for a failed attempt.
Finding the exact values Ledger Pro sends
Mismatches between Ledger Pro and your identity provider are usually a character-level difference in the SP Entity ID, and the fastest way to settle one is to read the authentication request Ledger Pro actually builds.
Request the SAML sign-in endpoint and decode the SAMLRequest value out of the
form it returns:
curl -s https://ledger.example.com/login_saml/ \
  | grep -o 'name="SAMLRequest" value="[^"]*"' \
  | sed 's/.*value="//; s/"$//' \
  | base64 -d
The decoded XML shows the exact Issuer (your SP Entity ID),
AssertionConsumerServiceURL, Destination, and ProtocolBinding that Ledger
Pro is sending. Register those values at your identity provider verbatim.
Identity provider example: Auth0
Auth0 is a convenient provider to validate a configuration against, and a developer account is free. The same values exist in every SAML 2.0 provider under different names.
In Auth0, create an application, then open its Addons tab and enable SAML2 Web App. The Usage tab of that addon exposes the IdP metadata, the identity provider login URL, and the signing certificate.
Map the values as follows:
| Ledger Pro setting | Auth0 value |
|---|---|
| IdP Entity ID | The issuer, for example urn:your-tenant.us.auth0.com. Not the Auth0 client ID. |
| IdP Single SignOn URL | https://your-tenant.us.auth0.com/samlp/<client-id> |
| IdP Logout Service URL | The SAML logout endpoint for the application. |
| IdP Public Certificate | The signing certificate from the application's SAML metadata. |
| SP Entity ID | Register this value as the audience in the SAML2 addon settings. |
| SP Assertion Consumer Service URL | https://ledger.example.com/acs, also set as the application callback URL. |
Two Auth0 specifics are worth calling out:
- Auth0 does not send a full name attribute by default, and it identifies users
by
nicknamerather thanusername. Both map correctly in Ledger Pro, but declare the attributes you want in the Settings tab of the SAML2 addon. - Groups are not available in a base Auth0 tenant. Add the Auth0 authorization
extension, create roles or groups there, and have the addon send them as a
groupsattribute.
Related
- Admin Section: users, teams, servers, and settings.
- LDAP Authentication: directory sign-in as an alternative or a complement to SAML.
- Configuration: logging and system configuration options.